
I will continue to fill this up with teasers as I work on the description and directions for the plane. Respond F if you want to be tagged.
Disclaimer This was based on suzutuki65's Grumman F-14 "Tomcat"
F-14A Trailer Video TOPGUN Intro
Controls
AG1+VTOL up=Flaps
AG2+LG down=Arrestor Hook
AG2+LG up=Wing Glove Vanes "Canards" Use for hard turns, or extra trim.
AG3=Catapult launch bar. Fire guns to launch after spooling engines.
AG4=Master Arm (weapons toggle)
AG5=Drop Weapons, except Aim-9 Sidewinders
AG6=Drop Fuel Tanks
AG7=Afterburner toggle, control with throttle
AG8=Lights, Stow Wings, Open Canopy. Make sure VTOL is not up.
VTOL= UP: Open Wings/ Mid: Auto Wing Sweep/ Down: Close Wings
Armament:
2 AIM-54C Phoenix (long range interceptor)
2 AIM-7 Sparrow (interceptor)
2 AIM-9 Sidewinder (guardian)
2 AGM-65 Maverick (cleaver)
Additional armament staged for changing load out. 
Here are some weapon arrangements that the Tomcat used, all weapons are mirror friendly, just nudge the detacher into the missile once they are attached (one large nudge at 250%) I demo how to properly do this in my trailer video.
Carrier Launch Procedure:Taxi to catapult line. AG3 to lower launch bar (flashing light on hook will alert you that AG3 is active). AG1+Vtol Up to deploy flaps. Once plane is locked in place throttle to 100% (afterburner optional AG7). Fire guns and hold down the trigger until airborne. Landing gear up. AG3 off. AG1 off. Center Vtol after building up some speed. Trim as necessary.
Carrier Landing Procedure: Slow to 350mph on approach. Vtol Up to extend wings. AG1 to deploy flaps. Landing gear down at 250mph. AG2 to deploy tail hook (if flashing starts blinking then you have AG3 on, recommend you turn it off). Trim as necessary. Target less than 140mph touchdown on carrier angle deck and apply brakes.
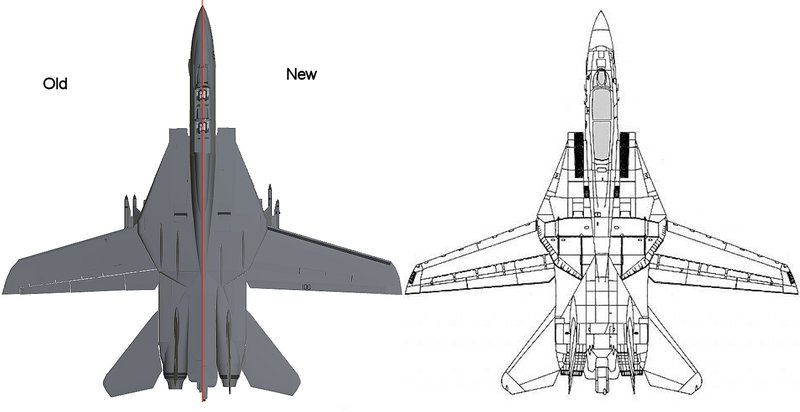
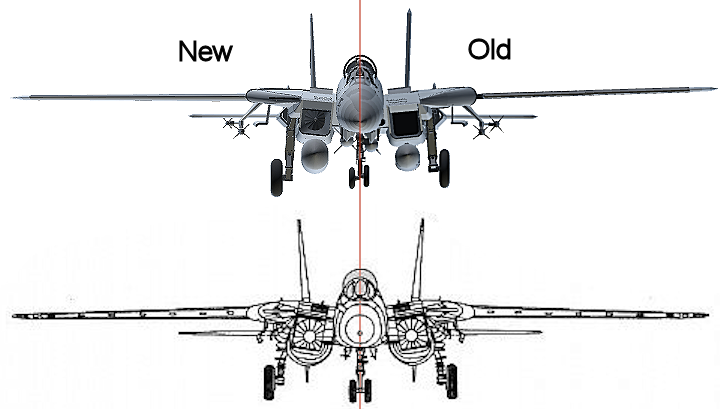
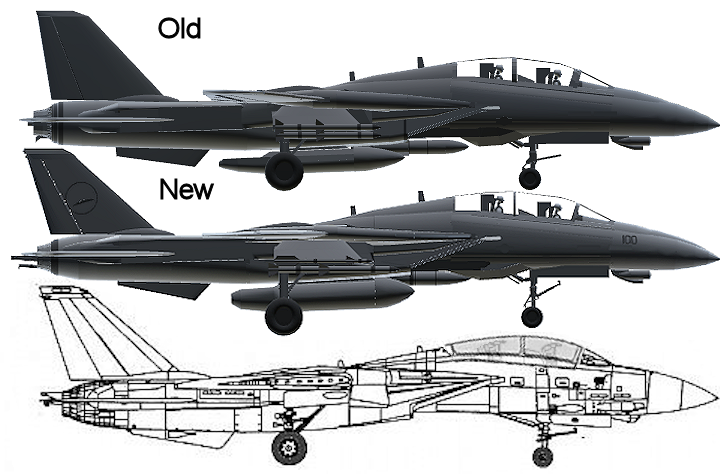
Ok, so here we go. Originally I was just going to do a tune up to suzutuki65's design as I thought it was the best version of the F-14 on the site :D. Well, I did some tuning, then I wanted the wings to sweep by themselves, then noticed the landing gear shackles didn't move, ect, ect. So I've pretty much rebuilt the whole plane at this point. I kinda wish I had started from scratch now, so it didn't feel like a hollow victory. Ah well. Here is my version of the F-14A based originally on suzutuki65's, I have rebuilt and refined 95% of the plane, only a couple of things remain untouched.
Here are some comparisons so you can see the differences side by side. Throughout this whole build I have been very focused on trying to keep the part count as low as possible, I will release an AI/Mobile version with some of the stuff ripped out to reduce the part count further, also planning on a high part/modded version. At a glance, the plane is exact to scale and as close to a simulation as I could get, lots of cool new features put in too.
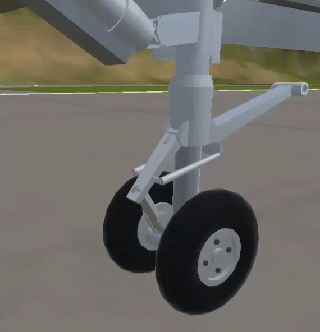
Landing Gear Flex
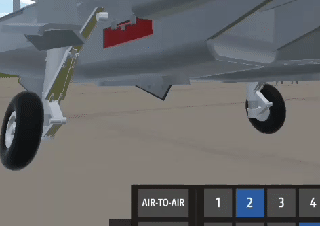
Here we are, this is what really started the whole overhaul fiasco. I saw that the parts were there on the original, but they didn't move or do anything. Let me tell you, attaching a free moving part on both sides of the spring was no walk in the park. I also noticed the landing gear was built in the designer already compressed, fixed that and adjusted spring tension accordingly. Re-balanced entire weight of plane to be accurate for replica.
Launch bar kneel then stow
This was extremely tricky to pull off. So after scouring the internet I found enough reference images to rebuild the landing gear, but had to kind of figure out how the launch bar works myself. So the launch bar is tied in with the front gear and on command from the cockpit the jet compresses it's front landing gear lowering the launch bar in the process.
In game I accomplished this by having a piston collide with the front spring and compress it. A friction pad will also deploy from the front landing gear after a moment and you can throttle up in place. I put a scaled gun in there with zero damage so when you hit fire guns it simulates the catapult experience. This will accelerate you to about 150mph by itself, so with the engine up you can easily launch off the end of the Beast.
I had to make the engines slow to spool up to simulate the fact that you wouldn't be able to just fly off the end, so use the launch procedure I designed. The Gear will disable its self to prevent landing issues, but you should really disable AG3 once you take off.
Intake air ramps, for supersonic flight
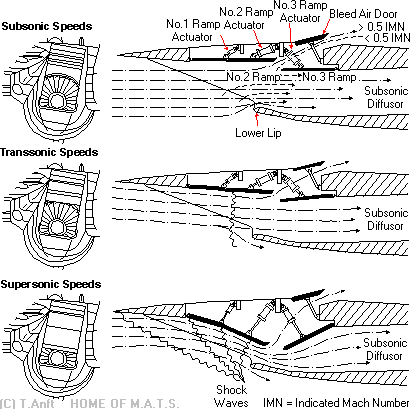
Never knew this was a thing, these block supersonic vibrations from entering the engine and causing damage, those top ducts are bleed air vents. Simulated with 2 air brakes per side scaled down and drag disabled.
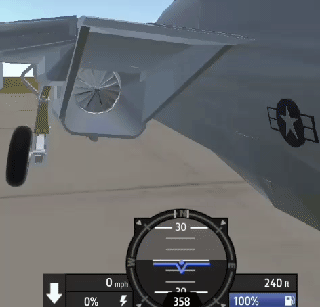
Exhaust nozzels
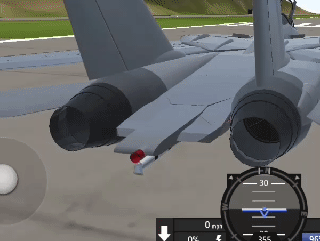
I went through 5 versions of these until I settled on this. Original had basic premise, but didn't look quite right. Very tedious to make. Plane has 4 primary engines ( J15 for fuel consumption and intake visual. BFE300 for engine glow ) and 4 afterburner engines ( BFE150 for sound and exhaust visual, BFE300 for afterburner flame ) There are also 2 vtol nozzles for jet exhaust and a scaled engine for vertical lift when the flaps are deployed.
Flaps, slats and spoilers
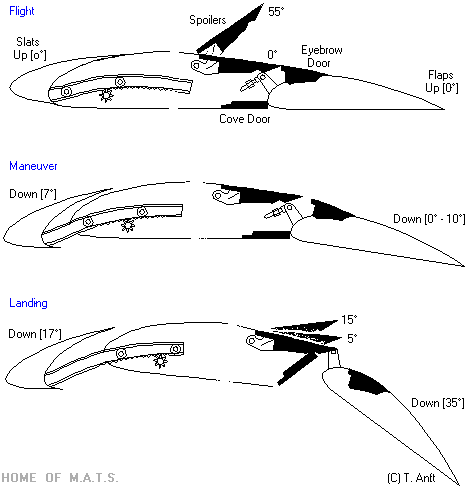
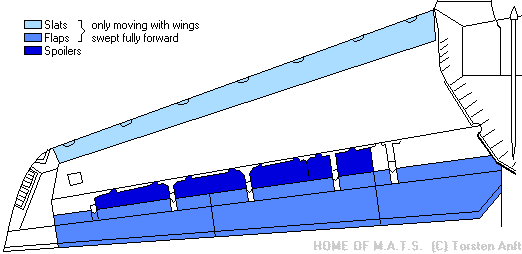
Rebuilt wings, made leading edge flap functional, all parts rotate to the actual degrees that they are suppose to IRL, consolidated parts used, removed 12+ parts. Added ailerons to simulate the spoilers for rolling. This was due to an asymmetric drag problem I had. I always try to actually make the part work for real first. The flaps consistently just made the plane nose dive, used a scaled vertical engine to simulate flaps.
Wings sweep to 68* then over sweep to 75* with Ag8. Ag4 deploys wing glove vanes.
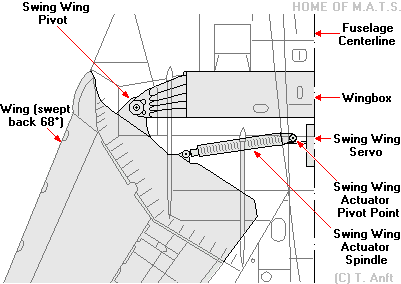
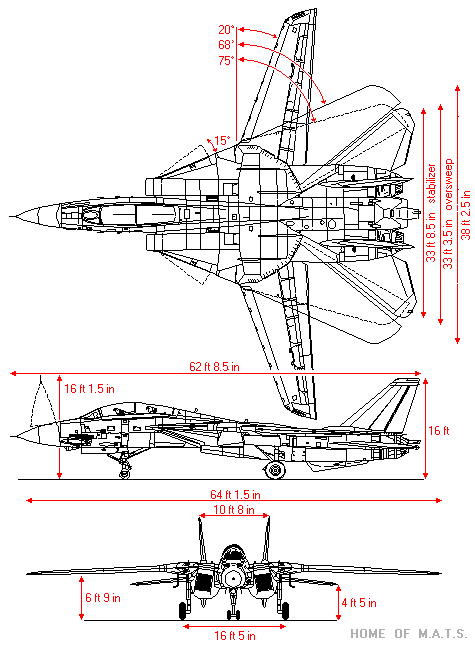
Rebuilt wing sweep mechanism, used pistons colliding with central bar tying wings together. Used piston attached with spring running on throttle for automatic wing sweeping (due to friction and throttle position). VTOL then runs two collision pistons (one for manual closed and one for manual open) and AG8 controls a third collision piston for over sweep when parking. Scaled the lifting wings and placed toward wing tips so that wing sweep actually affects the flight model. Added wing glove vanes to give additional lift and trim for high g's or high altitude. Added central wings that are tucked under the wing airbag (the grey spot) to allow tuning the turning radius, these can be adjusted if you want it to be more maneuverable.
The pivot point of the wings was critical in order for 68* sweep to actually arrive at the tips of the horizontal stabilizers. After this I ended up rebuilding the rest of the plane, cockpit ect to smooth everything out and realign the parts, or remove parts where possible. Figured out a cool trick using fuselage inlets to have a panel that has two colors. Lots and lots of hours tuning and tweaking. I don't know how much time it took the original author, but I'm probably not far off.
Finally added some decals to differentiate this from his, picked the squadron that I felt I could minimize parts with. On the whole if you compare mine to the original with the exact same load out the parts go as follows (Original 718, Remaster 815) So I pulled all this off with just under 100 parts added. That I feel is the most impressive part about the build.
@RodWan how do you make the nose landing gear not break with this realistic launch bar
@InternationalAircraftCompany lol
Press F to pay respects
@Mainblocks You should be g2g then, just be patient.
@RodWan Thanks, and im working on PC. So its good. Thanks a lot.
@Mainblocks ok so you'll need to be able to use the shift k command which requires a bluetooth keyboard at a minimum. Attach all the pieces on both sides and then nudge the connection rotor between them. In my case its the knee joint. Youll have orient the part so its attachment points are facing where you want it hooked. Shift k to reattach that part only, the use the tweak tool to reorient the part so it rotates correctly. Test and tune. Sometimes you have to nudge all three parts out of the build, attach the connection and then nudge them back
@RodWan That an impressive work.
But i would like to know how to attach a free moving part into a spring for theses landings gears ? I can't figure it out to make a suspension system working. At least a functional one.
WOW
@CoolPeach Thanks so much!
This is absolutely insane, very well done on all these functions. I look forward to playing with this plane!
@RodWan lels ok.
@AdlerSteiner It's on its way, Youtube is processing
@RodWan GIB ME YOUR TOMKAT NOW
@AdlerSteiner Yes but how many parts did he use. This is playable ;)
by the way, i'm surprised that your work is this amazing! but i'm kinda sad of how i remembered Sauce's Tomcat in every better replica i see of this airplane, but meh...it's impossible to defeat Sauce i mean...he's good! great work tho...
@ThePilotDude E